Show a room by day and night, or empty and furnished
- Plan: Pro
- Computer or phone
- Updated
In Vistura, one spot of a tour can have up to 6 versions: by day and at night, empty and furnished, before and after works. You add them under Other versions of this photo in the photo's settings, and buyers switch in place without losing where they were looking. Photo versions need Pro or Business on your account.
Before you start
Take the other photo from the same spot and at the same height as the first one, with the camera facing the same way if you can.
Steps
Add a version
- Open the tour in the editor and select the photo in the photo list. Its settings open.
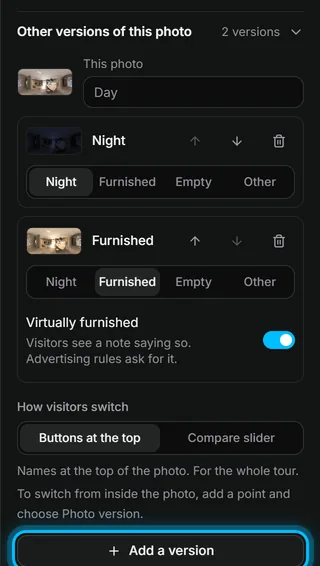
- Open Other versions of this photo.
- Select Add a version and pick the file.
- Choose its name: Night, Furnished, Empty or Other. With Other, type a name under Name of this version, such as "Sunset".
- If the furniture was added digitally, switch on Virtually furnished. Buyers see a note saying so.
Repeat for each version. Use the arrows next to a version to change the order buyers see.
Result buyers see the names at the top of the photo and switch with a tap, looking at the same spot of the room.
Choose how buyers switch
Under How visitors switch, choose for the whole tour:
- Buttons at the top: the names at the top of the photo. One tap shows that version.
- Compare slider: a line down the photo that buyers drag, with one version on each side and the same view on both. The names at the top choose the version on the right, Swap sides swaps the sides and Back to one photo goes back to one photo.
Switch from a point inside the photo
- Select Add > Point on the photo and select the spot on the photo where the point should go, for example the kitchen island.
- Under What a tap does, choose Photo version.
A tap on the point shows the next version, or opens the slider when the tour uses it.
Was this helpful?
Thanks for telling us.
Sorry it did not help. Write to us and we will answer: support@vistura.app
More in this section: Build the tour
- Add, replace and download photos
- Correct the colour of a photo
- Organise rooms and floors
- Name the tour and choose its cover
- Link the rooms so buyers can walk through
- Property details, location and what's nearby
- Add notes, photos and buttons inside a room
- Add or change a contact form
- Add a floor plan to your tour
- Add a video (drone or walk-through)
- Narrate the rooms and run the automatic tour
- Add pages to a tour: details, booking and contact
- Show a room by day and night, or empty and furnished
- Add running costs, energy rating, documents and works