Organise rooms and floors
- All plans
- Computer or phone
- Updated
In Vistura, you group a tour's photos into rooms and floors in the photo list, from Photos, rooms and floors (the + above the list). A room can hold several photos, and each floor has its own rooms. It works on every plan, on a phone or a computer.
Before you start
Upload the photos first: they arrive under Not in a room. See Add, replace and download photos.
Steps
Add a floor and its rooms
- Open the tour. On a phone, tap the panel button at the top left to open the photo list.
- Select Photos, rooms and floors (the + above the list), then Floor. A new floor appears in the list, named Floor 1, Floor 2 and so on.
- Select the + at the right of the floor's name. A new room appears with its name ready to type.
- Type the room's name, for example "Kitchen", and press Enter.
- Add a room for each part of the home.
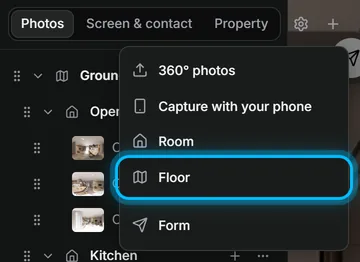
Put the photos in their rooms
On a computer:
- Drag a photo from Not in a room onto a room.
- Repeat for every photo. Drop a photo on a floor instead, and Vistura asks which room it goes in.
On a phone:
- Tap a photo in the list. Its settings open.
- Under Room, pick the room.
To move many photos at once, select More actions (the …) on one photo, then Select several. Tick the others, then choose the room under Move to room.
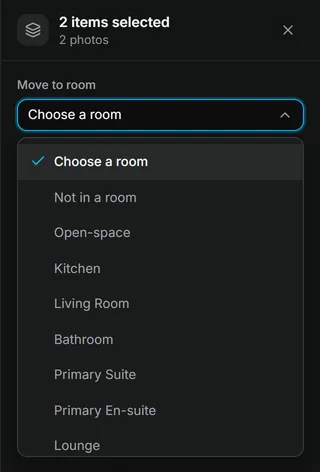
Rename a photo, a room or a floor
- Select More actions (the …) on its row in the photo list.
- Select Rename, type the new name and press Enter.
Name each photo after its room, so buyers see "Kitchen", not a file name.
Set the order
- Drag floors, rooms and photos up or down in the list. A room can also go to another floor.
- To choose which photo opens a room, select the room and pick it under Photo shown first.
Result the list reads like the home, floor by floor and room by room. Buyers see the photos in this order, and the room names guide them.
Was this helpful?
Thanks for telling us.
Sorry it did not help. Write to us and we will answer: support@vistura.app
More in this section: Build the tour
- Add, replace and download photos
- Organise rooms and floors
- Name the tour and choose its cover
- Link the rooms so buyers can walk through
- Property details, location and what's nearby
- Add notes, photos and buttons inside a room
- Add or change a contact form
- Add a floor plan to your tour
- Add a video (drone or walk-through)
- Narrate the rooms and run a guided tour