How to edit 360 photos: 6 fixes before you publish
How to edit 360 photos for a listing: level the horizon, hide the tripod, brighten dark rooms, remove the GPS and shrink the file without breaking the 360.
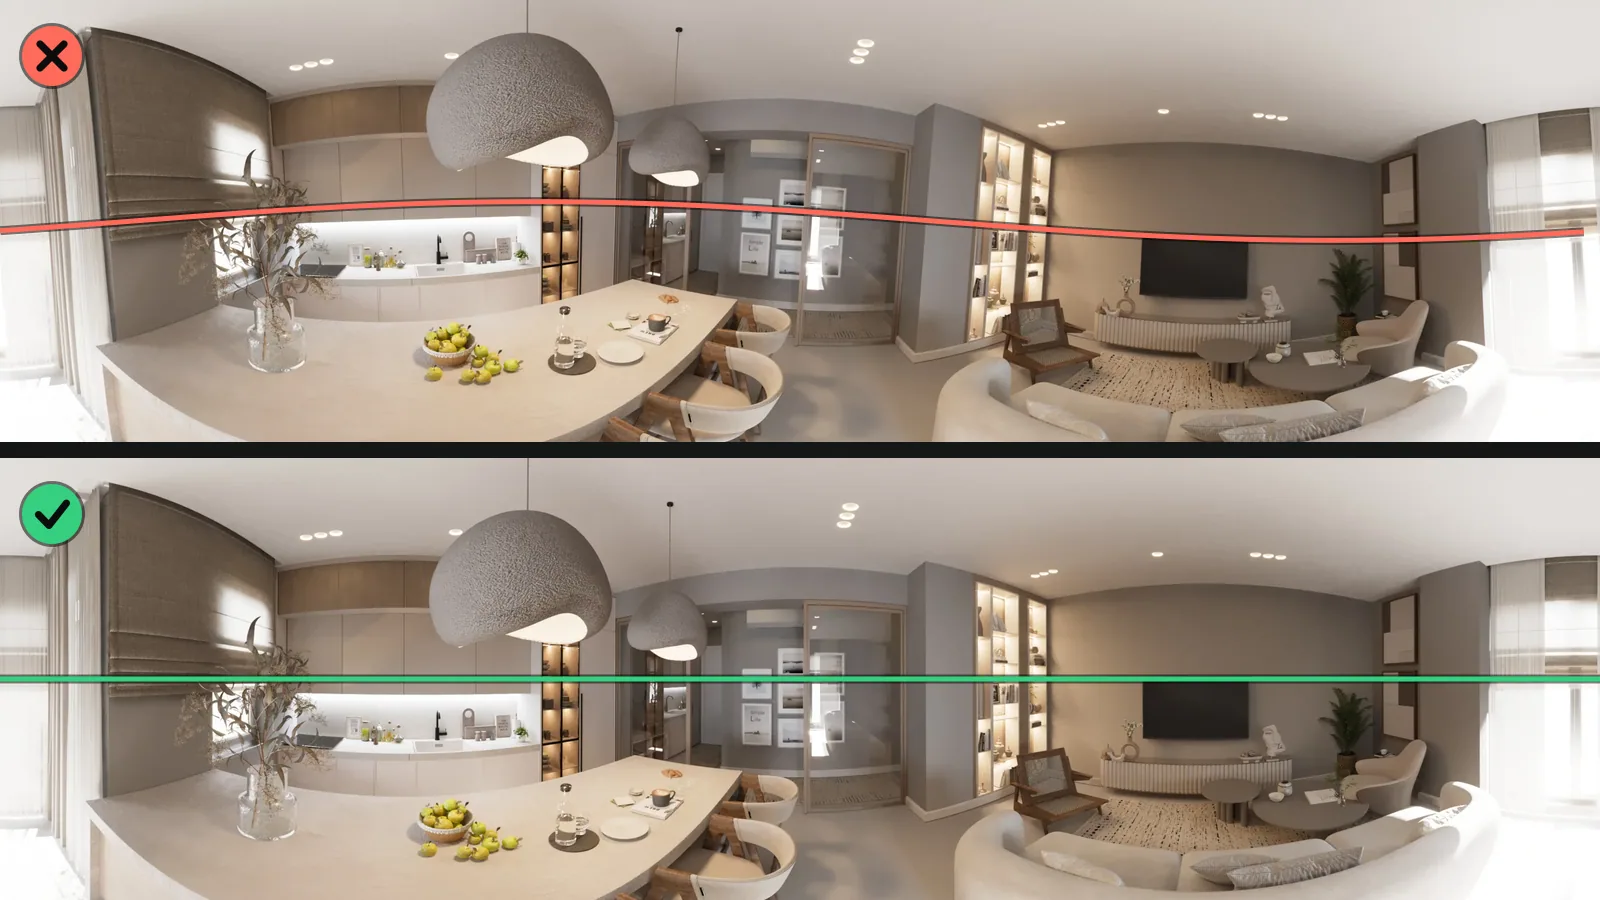
Here is how to edit 360 photos without breaking them: level the horizon, cover the tripod, fix the light, hide what should stay private, make the file the right size, and check it in a 360 viewer before you publish. A 360 needs more care than a flat photo because an ordinary editor sees only a picture twice as wide as it is tall. It does not know that the left and right edges meet, or that a few lines of hidden data tell viewers to open it as a sphere.
Below: what makes a 360 photo different, the order of work, each of the six fixes with a free browser route and a desktop route, and the software that handles 360 photos in 2026.
What makes a 360 photo different to edit
Three things, and every fix below has to respect them.
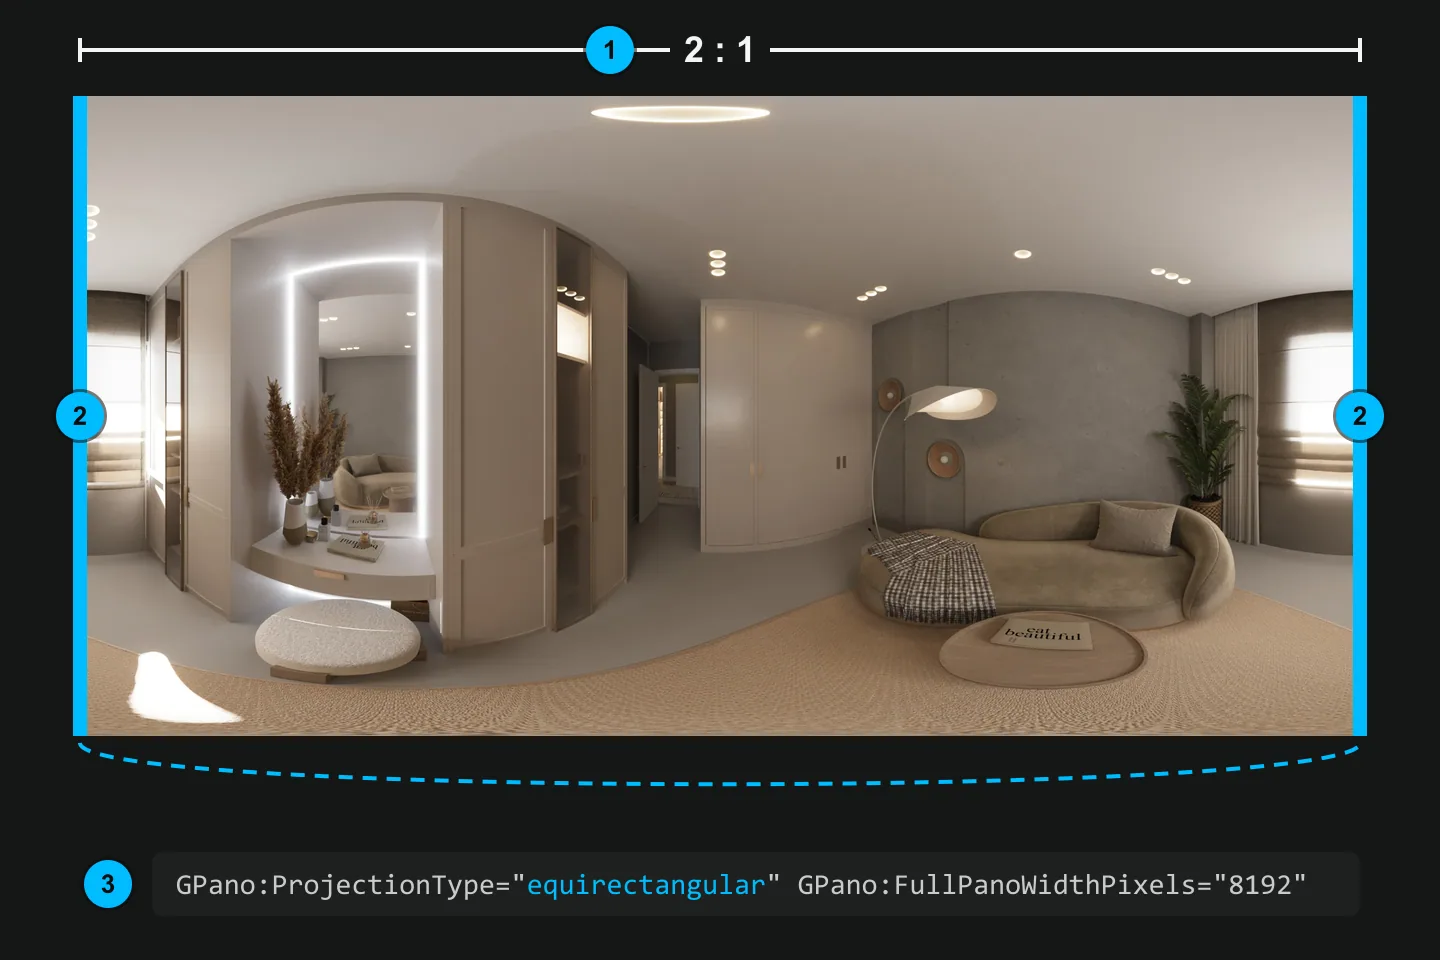
- The shape. A full 360 photo (an equirectangular image) is exactly twice as wide as it is tall. Crop or resize it off that 2:1 shape and no viewer can wrap it back into a sphere. Google's photo sphere spec says a viewer that finds an image scaled without updated metadata, and without its aspect ratio kept, should "not display the image as a photo sphere" (Google).
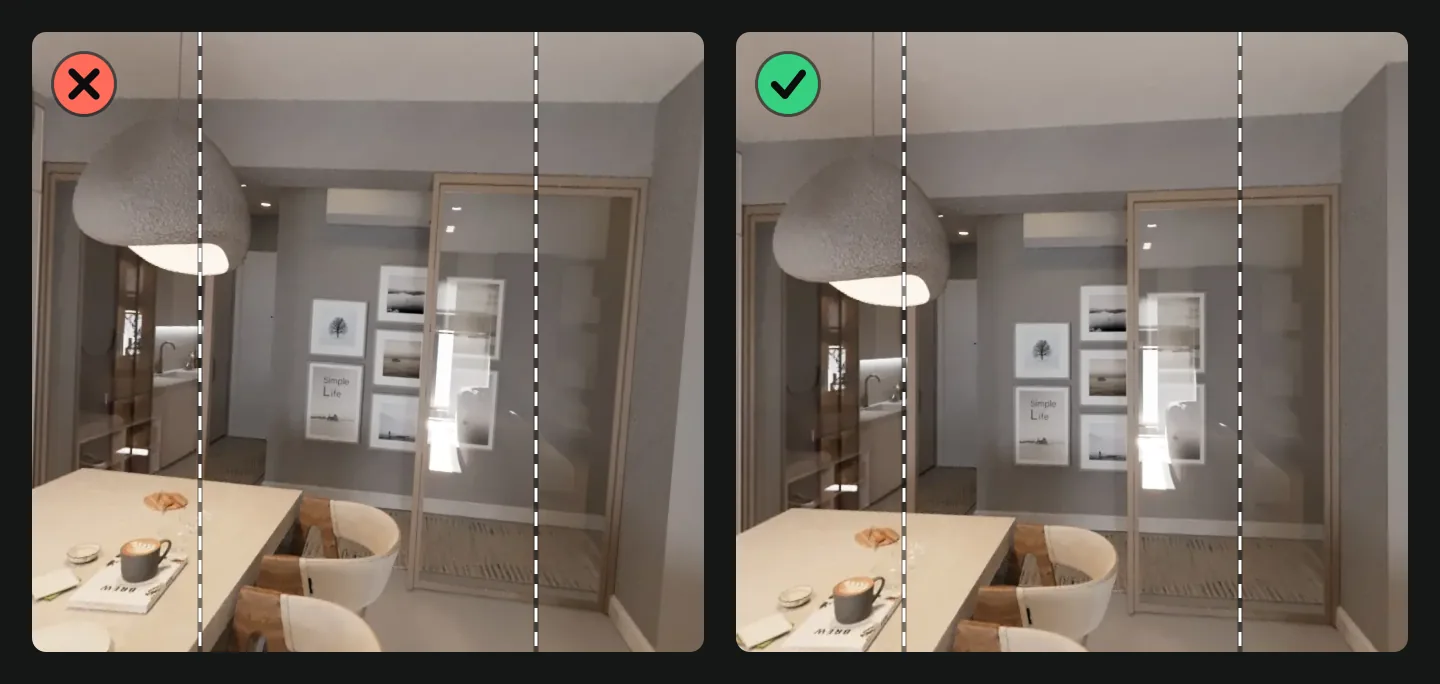
- The seam. The left and right edges are one line in the room. Whatever happens to one edge has to happen to the other, or a visible line appears behind the viewer.
- The metadata. A few lines of XMP, called GPano, hold the "properties that provide information regarding the creation and rendering of photo spheres" (Google). Without them a viewer may not open the file as a sphere, so check what the service you post to asks for. Many editors and messaging apps drop them. Users on Adobe's forum have reported that "the 360 metadata seems to be lost in the process" after editing in Lightroom (Adobe Community).
The order that keeps a 360 photo working
| Step | Why here | Free in the browser | On a computer |
|---|---|---|---|
| 1. Straighten | It turns the whole sphere, so everything else moves with it | Straighten a 360 photo | The camera's app at export, or Affinity's Straighten control |
| 2. Hide the tripod | The spot under the camera only settles after straightening | Remove the tripod | PaintShop Pro, or Affinity's live 360 view |
| 3. Light and colour | Changes to the whole photo keep the seam closed | Brighten real estate photos | Any editor, global adjustments only |
| 4. Privacy | Faces, documents and GPS go before anyone sees the file | Blur faces and remove metadata | Affinity's live 360 view for retouching |
| 5. Size | Shrinking last means you edit at full quality | Compress a 360 photo | The export settings of your editor or camera app |
| 6. Check | Catches a broken seam or lost metadata before buyers do | 360 photo viewer and 360 photo for Facebook | Open the exported file, not the project |
You can skip a step a photo does not need. Do not swap the first two.
1. Straighten the horizon
A 360 photo comes out crooked when the tripod stands on an uneven floor, the stick leans a little, or the camera's motion sensors misread the level. You see it as walls that lean, and as you turn round, the horizon rises on one side of the room and sinks on the other.
Fix it in one of three places:
- The camera's app. If it offers horizon correction when you export a 360 photo, switch it on. Menu names differ between versions.
- Affinity. Choose Layer > Live Projection > Equirectangular Projection, then use the Straighten control on the context toolbar to level the horizon (Affinity Photo 2 help).
- In the browser, free. The straighten a 360 photo tool levels it automatically from the room's vertical lines (door frames, wall corners) for tilts up to about 10 degrees, or by hand with a grid for up to 15 degrees. The download keeps full resolution, nothing is cropped, and the 360 metadata is written back.
Judge the result against a door frame straight ahead, not against the floor. The floor is stretched along the bottom of a 360, so it looks bent even when the photo is level.
2. Hide the tripod
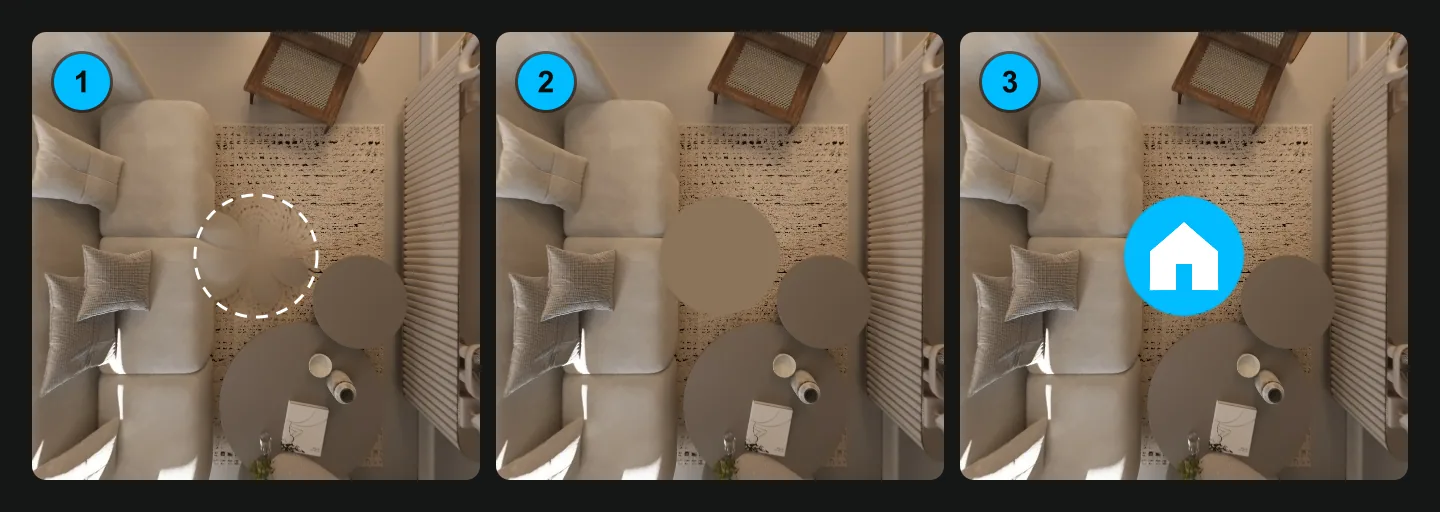
Straighten first, then patch. Straightening turns the sphere, so the spot under the camera moves; a patch made before it ends up in the wrong place. The capture side, such as why an invisible stick vanishes but tripod legs still show, is covered in 360 camera for real estate.
There are three ways to cover the spot:
- Floor fill. The patch is filled in from the floor around it. Best on plain floors: wood, tiles, carpet.
- Plain disc. A circle in one colour. Better on busy patterns, where a fill can smear.
- Logo disc. Your logo on the floor. Good for branding, but not everywhere.
Where a logo goes matters. Google Maps asks for no "distracting effects or filters" at the bottom of a photo sphere (Google Maps Help), so use the floor fill for Maps. For MLS or portal photos, check your MLS's branding rules before you put a logo on the floor.
The free tripod remover offers all three covers in the browser: floor fill, a colour disc or your logo, with a patch from 8 to 35 degrees, and a full-size JPEG with the 360 metadata. On a computer, PaintShop Pro has its own help topic on removing a tripod from a 360 photo (Corel), and Affinity's live projection lets you retouch the floor while you look straight down at it (Affinity).
3. Fix exposure and colour without a seam
Rooms come out dark because the bright window pulls the exposure down, and yellow because bulbs and daylight mix.
The seam rule: change the whole photo the same way and the edges still meet. Exposure, white balance and overall contrast are safe. Tools that look at neighbouring pixels are not: clarity, shadows and highlights in many editors, local brushes and healing. At each edge they see different neighbours, so they can leave a line where the photo joins. A long-standing tip on Adobe's forum is to leave highlights, shadows, whites, blacks and Clarity alone when you edit 360 panoramas in Lightroom (Adobe Community).
The best fix happens at capture: HDR or bracketing on a 360 camera keeps detail in the window and in the corners at once (see dynamic range in 360 camera for real estate).
After capture, the free brighten tool has an Auto setting that reads each photo, lifts the shadows, holds back the windows and takes out the yellow cast. On a 360 photo it applies the same adjustment to every pixel, so the edges still match. It takes several photos at once and returns them in a ZIP.
If you edit in Lightroom or Camera Raw, keep to global sliders, then check the seam and the metadata in step 6.
4. Remove what should not be public
A 360 shows the whole room, including what is behind you. Turn all the way round and look for:
- people, and faces in mirrors or windows;
- number plates through a window or in the drive;
- family photos, children's names on doors;
- letters, documents, a screen with mail open.
The free blur faces in 360 photos tool lets you blur or pixelate faces, number plates, family photos and documents: you mark each area and it is hidden.
Then the location. Phones and many cameras record GPS in the file, which gives away exactly where the home is. The free metadata remover strips it without re-compressing the photo and keeps the 360 metadata by default. The straighten, tripod, brighten and compress tools in this guide already leave the GPS out of their downloads, so the remover is for files you edited elsewhere.
5. Make the file the right size
Pixels and megabytes are two different limits. Google Maps wants at least 7.5 MP (3,840 x 1,920), a 2:1 ratio and no more than 75 MB (Google Maps Help).
Width does most of the work. A 4K photo (4,096 x 2,048) has a quarter of the pixels of an 8K one (8,192 x 4,096), and it still clears Google's 7.5 MP minimum.
An ordinary compressor may drop the metadata or nudge the shape off 2:1. The free compress a 360 photo tool picks 8K, 7.7K, 6K, 5.7K or 4K, or a target size in MB, and always keeps 2:1 with the 360 metadata written. The camera's date, model and location are left out unless you tick them.
To pass a 360 to a colleague or an owner, do not send it through a messaging app as a photo: it usually arrives smaller and without its metadata. Send it as a file or a link.
6. Check it before you publish
Thirty seconds, five checks:
- Open the file in a 360 photo viewer and look at the join behind you, straight down and straight up. No line, no smear.
- A door frame straight ahead is vertical.
- The file is still twice as wide as it is tall.
- It still has its 360 metadata: check it for Facebook and Google Maps.
- It is under the platform's size limit.
Need flat photos of the same rooms for the listing gallery? Cut them from the 360 with the 360 photo to normal photo tool.
What you may edit in a listing photo
The six edits above fix the photo, not the home.
California's CRMLS spells it out. Its 2026 FAQ says a "Digitally Altered Image" does not include "slightly enhanced lighting, sharpening, white balance, color correction, angle, straightening, cropping, exposure, or other common photo editing adjustments that do not change the representation of the real property" (CRMLS). Adding, removing or changing furniture or appliances does count: the photo needs a label such as "Virtually Staged" or "Digitally Altered", and the unaltered original right before or after it. Changes to the property itself, or to "views through windows", are not allowed.
That is California's MLS. Elsewhere, check your own MLS's or portal's rules before you publish. For flat photos and the full disclosure rules, see real estate photography tips.
Desktop software for 360 photos in 2026
| Software | 360 view while editing | Price note | Watch out for |
|---|---|---|---|
| Affinity (by Canva) | Yes: live equirectangular projection with a Straighten control (help) | "Free for individuals" (Affinity) | The help describes Affinity Photo 2; menu paths may differ in the new app |
| Photoshop | Spherical panorama commands, depending on the version | Check Adobe's current plans | "As of Photoshop 22.5, released in August 2021, Photoshop's 3D features will be discontinued" (Adobe Community): check whether your version still has them |
| Lightroom | No 360 view or seam mode | Check Adobe's current plans | Users have reported lost 360 metadata on export (forum): check the exported file |
| PaintShop Pro | 360 tools for straightening and tripod removal (Corel) | Check Corel's site | Look for the 360 topics in your version's help |
| The camera's own app (Insta360 Studio and similar) | Depends on the maker | Check the camera maker's site | Check whether the export offers horizon correction |
General app lists rarely say which editor keeps the 360 metadata. Whatever you use, finish with the checks in step 6.
Edit every room of a tour at once
Once the photos are rooms in a Vistura tour, the same fixes sit in the editor; colour and tripod can be applied to every photo at once. "Straighten automatically" levels a photo from its vertical lines, and hotspots turn with it. "Auto colour on all photos" corrects every room in one go, on every plan; on Pro you also adjust each photo by hand with sliders and see the result live in the 360 view. On Pro and Business, "Hide the tripod" covers the spot on every photo with "Apply to all photos": "Clean" fills the tripod in from the floor around it, or a colour or your own logo covers it. Colour and tripod edits keep the original photo; after straightening, one undo step brings the previous photo back.
When photos are uploaded, Vistura removes the camera metadata, GPS position included, from the stored files, and makes lighter versions for phones. So there is no need to shrink a photo for the tour: anything up to 25 MB goes in. See the plans for what Pro and Business add.
Edit one photo free in the browser with the tools above. To put every room into one virtual tour buyers can walk through, start a tour, or shoot the rooms with your phone using Vistura Capture. If you shoot on an iPhone, the 360 photo on iPhone guide covers the capture.
Frequently asked questions
Can I edit a 360 photo on my phone?
Yes. The free browser tools linked in this guide run in the phone's browser, with no app to install and no account. They straighten, cover the tripod, brighten, blur, compress and check 360 photos on the device, and the download keeps the 360 metadata.
Why does my edited 360 photo show as a flat picture on Facebook?
Usually the editor dropped the 360 metadata on export, or a crop or resize changed the 2:1 shape. Check the file with the free 360 photo for Facebook tool: it tests the shape and the metadata and can add the metadata to a JPEG without re-encoding it.
Will editing a 360 photo lower its quality?
Each JPEG save compresses the photo again, so a little detail goes each time. Edit from the original file, never from a copy downloaded from a platform, and save at high quality: the free straighten tool saves at JPEG quality 92 at full resolution, and the metadata remover does not re-compress at all.
Should I edit the 360 photos before or after I build the tour?
Either works. Edit before if you also need the photos for Google Maps or Facebook. In a Vistura tour the editor straightens, corrects colour and covers the tripod on the tour's own photos, and colour and tripod edits keep the original photo, so you can also edit after.
Do I have to say that a listing photo was edited?
It depends on your MLS or portal. CRMLS in California says lighting, white balance, colour correction, straightening, cropping and exposure do not need a label, but adding, removing or changing furniture or appliances does. Elsewhere, check your MLS's or portal's rules before you publish.