Real estate photography tips: shoot and fix on a phone
Real estate photography tips for phone shooters: where to stand, which lens to use, how to light a room and how to fix leaning walls after the shoot.
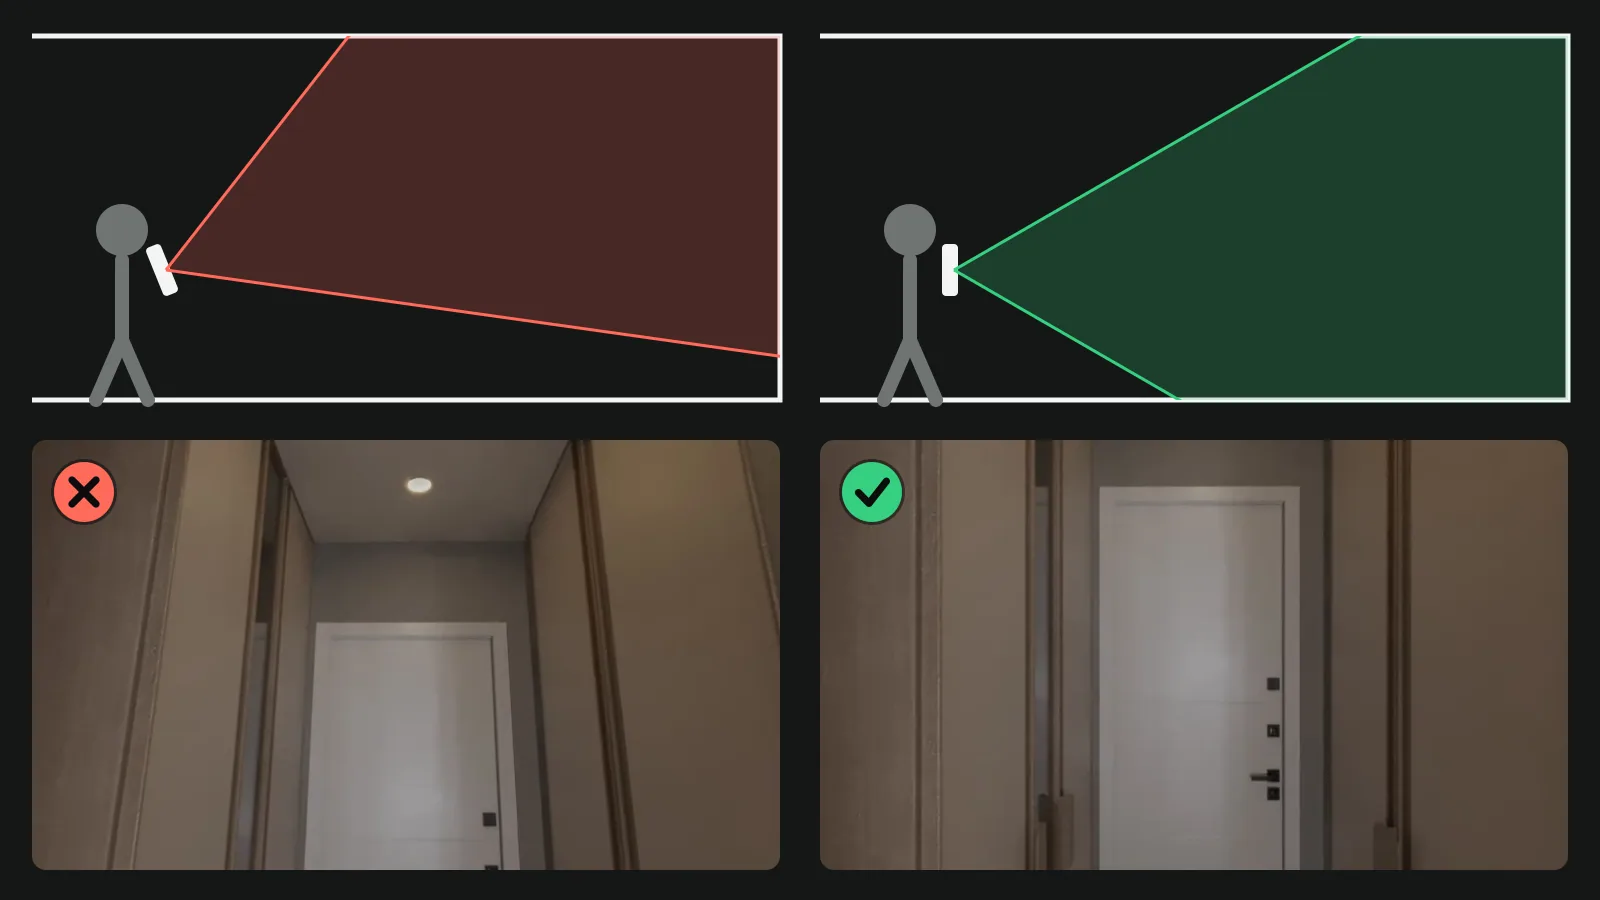
These real estate photography tips work with the phone in your pocket: hold it level at chest height, use the 0.5x lens for rooms, switch on every light, and straighten leaning walls before you upload. Most weak listing photos come from a tilted phone and a dark room, and both take minutes to fix.
This guide follows the order of a shoot: set up the phone, prepare each room, frame and light the shot, then fix and check the photos before they go on your MLS or portal. Every step works on an iPhone or an Android phone, with no extra kit.
Set up your phone before the first photo
Two switches and three habits do most of the work. You set the switches once.
On an iPhone
- Open the Settings app, tap Camera, then turn on Grid and Level, as Apple's iPhone guide describes.
- Open the Camera app. The grid lines give you something to line door frames and wall corners up against, and the level tells you when the phone is straight.
For real estate photography with iPhone, those two switches matter more than any app you could add.
On an Android phone
Switch on the grid in your camera app's settings. The menus differ from one maker to another, so look for a grid option under the camera's settings.
Before every shoot
- Wipe the lens with a soft cloth. A fingerprint makes every photo hazy.
- Use Photo mode, not Portrait and not Pano.
- Hold the phone horizontally. Rooms are wider than they are tall, and a landscape frame shows more of each one.
Prepare each room in ten minutes
The camera is harsher than the eye. As HousingWire puts it, "Cluttered photographs are often worse than they look in person", and "Poor lighting can hide the best features and make rooms feel smaller". Go through the home once with this list before you take a single photo:
- Every light on, in every room, including lamps and cooker hood lights.
- Blinds and curtains open.
- Worktops and tables cleared, apart from one or two simple items.
- Cables, bins, pet bowls and laundry out of sight.
- Toilet seat down, towels straight.
- Family photos, post and anything with a name on it put away.
- Mirrors and glass doors checked from where you will stand, so you are not in the shot.
Ask the owner to leave pets and children with someone else for the hour of the shoot. Moving people around takes longer than the photos.
Where to stand and how high to hold the phone
Stand in a corner or a doorway, looking across the room towards the far corner. This shows the room's depth and two or three walls at once. For the main rooms (the living room, the kitchen and the main bedroom) take a second angle from the opposite corner, so you can pick the better one later.

Hold the phone at chest height with the lens pointing straight ahead, which is HousingWire's advice too: "A tilted photo is like nails on a chalkboard for buyers". In kitchens and bathrooms you can go a little lower to show worktops, as long as the phone stays level.
Why walls lean in photos
When you tilt the phone up to fit the ceiling, or down to fit the floor, the vertical lines in the room stop being parallel. Walls, door frames and cupboards lean inwards or outwards. Photographers call these converging verticals. Adobe's guide to real estate photography gives the same fix for cameras: you "eliminate unintentional distortion by placing your camera on a tripod that's level to the floor". Phixer, an editing company, lists converging verticals among the common signs of an amateur real estate photographer.
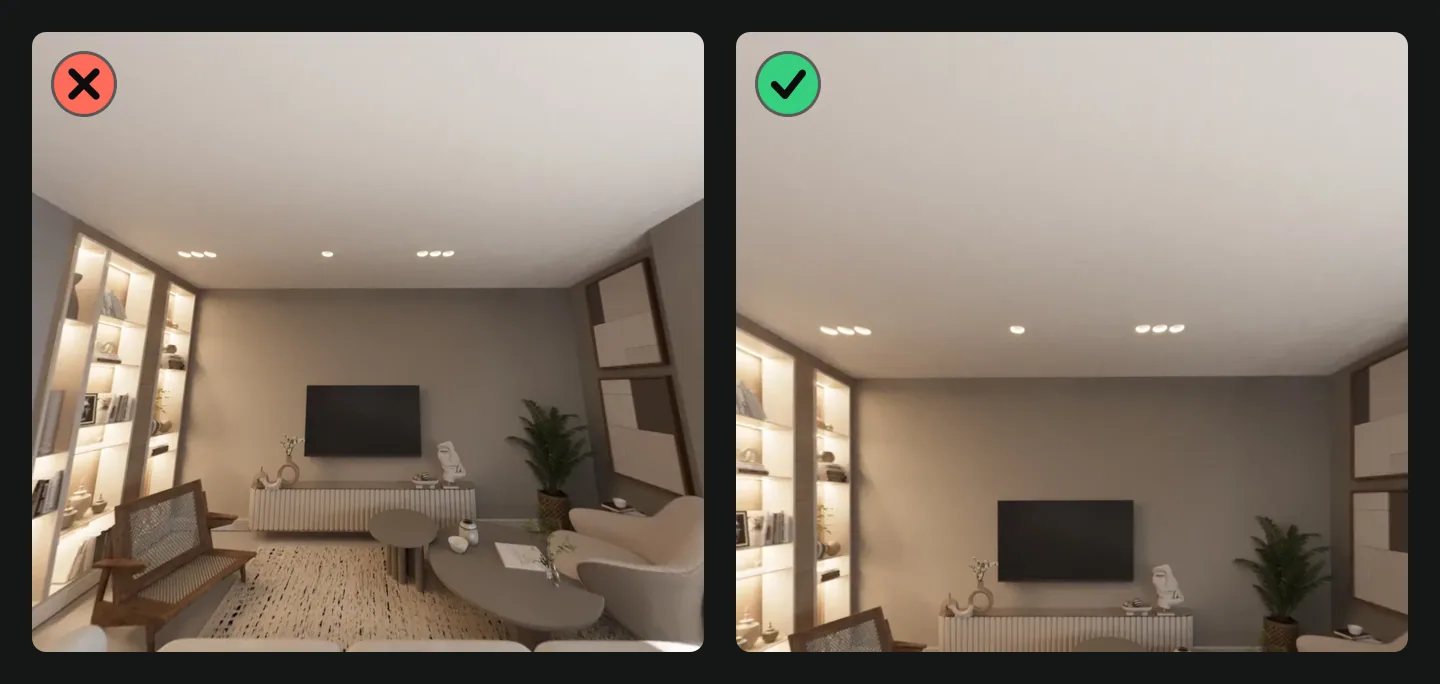
The fix happens before you press the shutter. Keep the level at zero. If the ceiling or the floor does not fit, step back or switch to a wider lens; do not tilt. The ceiling may take up a little more of the frame than you like, and that is easier to crop than leaning walls are to fix.
Which lens: 0.5x, 1x or 2x for wide angle real estate photos
Your phone's lens buttons are your focal lengths. On an iPhone you tap 0.5x, 1x, 2x and so on to switch, "depending on your model", as Apple's camera basics put it. Here is what each button means on an iPhone 17, from Apple's specifications:
| Button | Focal length on iPhone 17 | Use it for |
|---|---|---|
| 0.5x | 13 mm, 120 degree field of view | Most rooms, small bathrooms, corridors |
| 1x | 26 mm | Large rooms, exteriors, a corner with a feature |
| 2x | 52 mm | Details: a tap, a fireplace, the view from a window |
Photographers who shoot interiors for a living start at a similar width. Adobe's guide to real estate photography says "A focal length starting at 14mm or 16mm is a good choice for real estate". The 0.5x lens is already that wide, so wide angle real estate photos do not need a new camera.
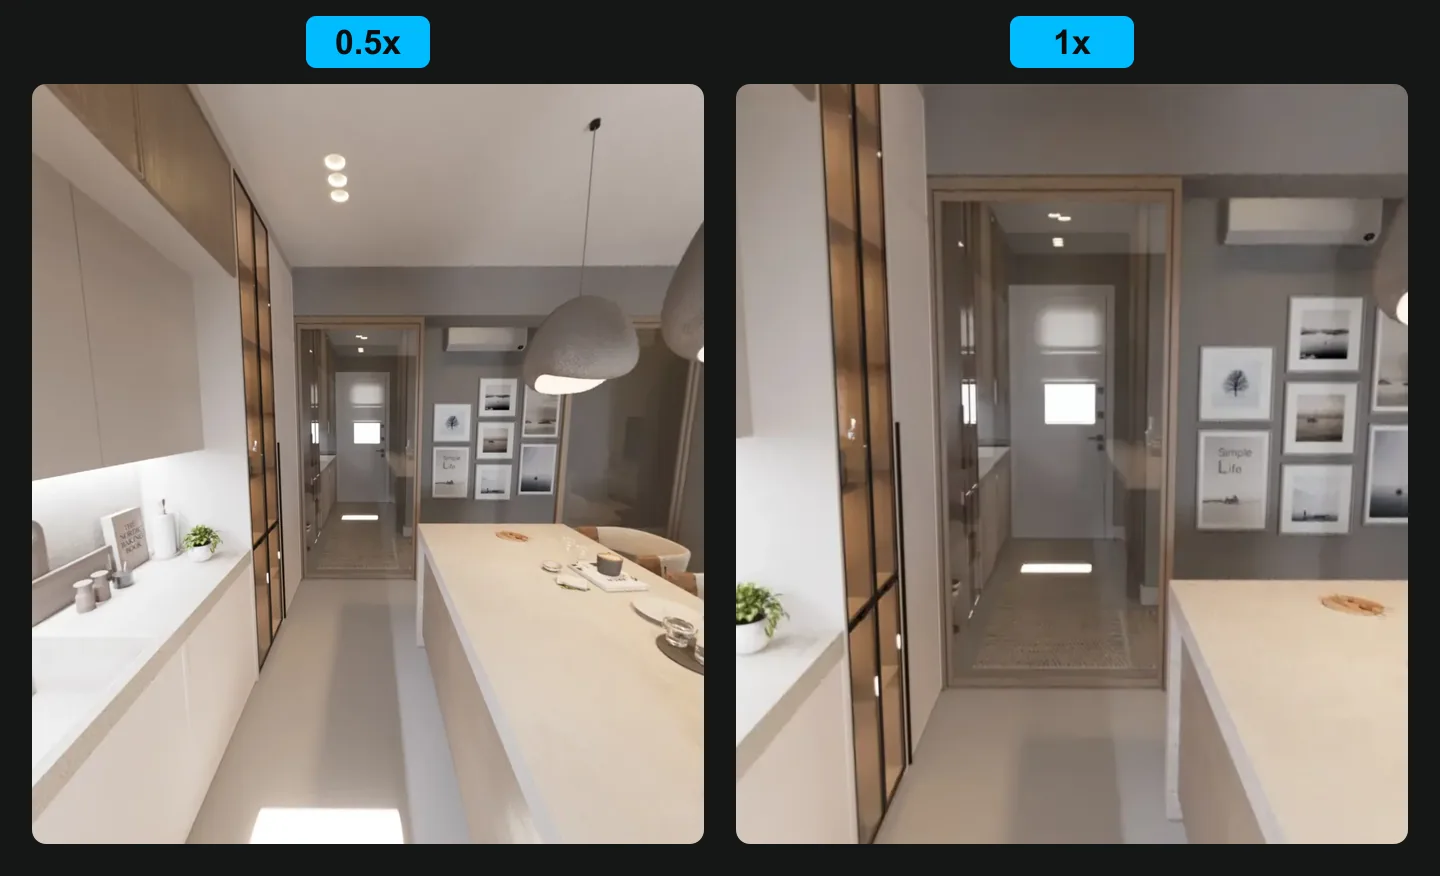
Two habits keep wide photos honest:
- Keep furniture away from the edges of the frame. An ultra wide lens stretches whatever sits at the sides, so a chair at the edge looks bigger and odder than it is.
- Use the buttons, not an in-between zoom. Tapping a button tells you exactly which lens you are on, and every room in the listing then has the same look.
Other phones have similar buttons with other numbers. The rule is the same: the widest lens for rooms, the main lens for large spaces and outside, the zoom for details.
Light, exposure and HDR on a phone
Your phone already does what DSLR guides call HDR. On a camera, HDR means taking several photos at different exposures (bracketing) and blending them so both the window and the room show. A phone merges exposures by itself: Smart HDR is listed in the iPhone 17 specifications. You do not need to bracket.
You can still help it. Apple's guide gives two controls:
- Exposure. Tap the room to focus, then "drag up or down to adjust the exposure" next to the focus area. Brighten a dark room a little; darken it if the windows turn white.
- AE/AF Lock. "Touch and hold the focus area until you see AE/AF Lock". The exposure then stays the same while you take several frames of the room.
Shoot interiors when the daylight is soft. Do not point the phone straight into a sunny window, and leave the phone's flash off: it lights the nearest object and leaves the rest of the room dark.
So which real estate photography settings matter on a phone? Four: Grid, Level, the lens button and the exposure. Everything else can stay on automatic.
The shot list
Take the photos in the order a buyer walks through the home, and upload them in that order too:
- The front of the house, the first photo on the listing.
- The entrance or hall.
- The living room, from two angles.
- The kitchen, from two angles.
- The dining area.
- Each bedroom, starting with the main one.
- Each bathroom.
- Outdoor space: garden, balcony, terrace or parking.
- The view, if it is a selling point.
Before you upload, read your MLS's or portal's photo rules. Florida's Stellar MLS, for example, says "Photos must represent a true and accurate picture of all property features" and does not allow lifestyle photos featuring people. Rules on signs, logos and contact details in photos also differ from one MLS to the next, so check yours.
Fix your photos after the shoot
Even with care, some photos will lean a little or carry data you do not want to publish. Fix both before the upload.
Straighten leaning walls
Rotation and vertical correction are two different fixes: rotation fixes a photo tilted to one side, and vertical correction fixes the lean you get from pointing the camera up or down. Apple's Photos app gives them separate buttons. Leaning walls need the second one. Here are four ways to do it on a phone:
| Tool | Automatic? | Where | Cost |
|---|---|---|---|
| Photos app on iPhone | No, you drag a slider | iPhone | Comes with the iPhone |
| Snapseed, Perspective | No, you pinch and drag | Mobile app | See its app store listing |
| Lightroom mobile, Upright | Yes (Auto, Vertical) or with guides | Mobile app | Paid version, according to Adobe |
| Vistura's Fix vertical lines | Yes, or with sliders | Any browser, phone or computer | Free, no account |
In the Photos app on an iPhone, open the photo, tap Edit, then Crop. Apple's guide explains that you "tap a button below the frame to straighten, tilt vertically, or tilt horizontally" and then drag the slider. Choose the vertical tilt and drag until the door frames line up with the grid.
In Snapseed, the Perspective tool lets you "adjust perspective distortion intuitively with standard pinch, zoom, and drag gestures", and "with healing turned on, Perspective will automatically fill any blank edges", according to Google's Snapseed help.
In Lightroom mobile, open Crop, then the Geometry tab, and choose an Upright mode: Auto, Vertical, or Guided, where you draw two to four guides along lines that should be straight (Adobe help). Adobe lists the geometry tools among the premium features of Lightroom mobile.
With Vistura's free Fix vertical lines tool, open it in any browser on your phone or computer and choose the photo. It finds the vertical lines by itself, or you set them with a slider. It then crops the empty corners while keeping the photo's proportions, and you download the result with no watermark. The photo never leaves your device, and you do not need an account. It works with JPEG, PNG and WebP.
Remove the location before you upload
Phones record where each photo was taken: "Photo geotagging" is in the iPhone 17 specifications. A listing photo can carry the home's exact GPS position and the date and time you were there. That is information you may not want to hand to anyone who downloads the photo, so remove the GPS location from your photos before they leave your computer or phone. Photos you upload to a Vistura tour lose it automatically, so the tool is for files you send anywhere else.
Edits you may make, and edits you must disclose
In California, the line is now written down. Assembly Bill 723 took effect on 1 January 2026, and the California Regional MLS (CRMLS) applies it through its Rule 11.5.2, explained in the CRMLS FAQ on digitally altered images (updated 13 February 2026).
Allowed without a label: "lighting, sharpening, white balance, color correction, angle, straightening, cropping, exposure, or other common photo editing adjustments that do not change the representation of the real property". The fixes in this guide are all on that list. The California Senate's analysis of the bill lists the same exemptions.
Needs a label and the original: adding, removing or changing furniture or appliances, including AI staging. CRMLS calls the result a digitally altered image. It needs a label such as "Photo Modified", "Virtually Staged", "Digitally Altered" or "AI Altered", and the unaltered photo placed "immediately before or after" it.
Not allowed: altering the home itself ("flooring, walls, windows", the "landscape, façade, fixtures") unless it will be improved to match the photo by closing, or anything outside it, such as the "views through windows".
The UK has had its own case. In August 2025, The Negotiator reported that photos with "imaginary furniture" came off an agent's Rightmove listing for a home in Eaglescliffe "at the portal's request", even though the listing said some images were virtually staged. Outside California, check your MLS or portal before you upload an edited photo.
If you would rather hand the editing to someone else, services exist for that. BoxBrownie, for example, lists image enhancement at €2 a photo and item removal at €10 on its price page in October 2026 (it shows prices in the visitor's currency).
360 photos: the same rules, one more step
Everything above applies to 360 photos too: the same preparation, the same height in every room, the phone level. The difference is that a 360 photo has no "outside the frame". Everything in the room shows, including you if you stay in it. Our guide to taking a 360 photo on iPhone compares every way to do it, step by step.
Vistura Capture makes the 360 photo of each room in your phone's browser, with no app to install. Capturing needs no account; to send the photos, you sign in with a free Vistura account, and "Send to Vistura" turns the rooms into a tour. If a 360 photo leans, the free tool to straighten a 360 photo fixes it, automatically or with sliders. In the editor, "Straighten automatically" does the same on every plan, with no separate tool.
Put photos and 360s in one tour
Regular photos and 360 photos can live in the same place. In a Vistura tour, select a photo in the editor, open Advanced and switch on "Regular photo (not 360°)": it is then "Shown flat, without turning around", next to the 360 rooms. A detail shot of the fireplace or the view sits in the tour beside the room it belongs to. You share the whole tour as one link, or download its QR code as a PNG for flyers and window cards.
For how tours work and what they add to a listing, read the guide to the real estate virtual tour.
Checklist before you upload
Go through the set once, photo by photo:
- The level was at zero, and walls and door frames stand straight (fixed if not).
- Every light is on, and the bulbs look alike in colour.
- No person, pet or reflection of you in any photo.
- No furniture cut in half at the edges of the frame.
- Windows show detail, not a white glare.
- The GPS location is removed from every file.
- Every edit is on the allowed list, or labelled with the original next to it.
- Files are named by room, so the order is easy to set.
- The front of the house is the first photo.
Ten minutes of preparation, a level phone and one pass of fixes after the shoot: that is the whole method. Try it on the next home you list.
Frequently asked questions
Is an iPhone good enough for real estate photos?
For most listings, yes, when the technique is right: level, lights on, the right lens. The ultra wide 0.5x lens on an iPhone 17 is 13 mm with a 120 degree view, wider than the 14 mm or 16 mm that Adobe's guide suggests for real estate. A professional still makes sense for twilight shots, drone views or a large home where every photo has to be perfect.
Do I need HDR for real estate photos?
Not as a separate step on a phone. The phone merges several exposures by itself, which is what Smart HDR does on an iPhone. Bracketing and blending by hand is the camera method. You help the phone most by shooting when the daylight is soft and by keeping the brightest window out of the centre of the frame.
Can I use AI to declutter or stage listing photos?
Yes, as long as you follow the disclosure rules where you list. In California, an image with added or removed furniture needs a label and the original photo next to it. Editing services such as BoxBrownie list virtual staging at €30 a photo on their price page (October 2026). Outside California, ask your MLS or portal before you upload.
What time of day is best for real estate photos?
Shoot interiors when the light is soft and even, so windows do not burn out and corners do not go dark. Photograph the front of the house when the sun is on it, not behind it. If the home has good outdoor lighting, a shot at dusk with every light on can be the listing's best photo.