Make your first tour
- All plans
- Computer or phone
- Updated
In Vistura, a first tour takes 4 steps in the editor: upload the 360 photos, link them, add your card and share the link. Every step works in a phone browser; start from Create tour on your dashboard.
No 360 camera? Your phone is enough. Vistura Capture takes the photos with your phone, room by room: see Take 360 photos with your phone.
Before you start
You need a Vistura account and one 360 photo per room. No photos yet? Open the example tour first: on your dashboard, select Help > Tutorial.
Steps
No photos yet? Open the example tour
- On your dashboard, select Help at the bottom left.
- Select Tutorial.
The example tour opens with its own guide. It is private and does not count toward your tours online, so you can try everything on it.
Step 1: Upload the 360° photos
- On your dashboard, select Create tour, then Upload 360° photos. The editor opens, with the guide Your tour in 4 steps at the bottom.
- On a phone, tap the panel button at the top left to open the photo list. On a computer, it is on the left.
- Select Upload photos and pick the photos.
- Wait until every photo shows in the list.
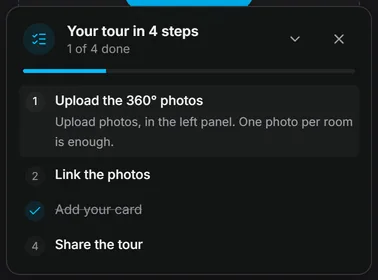
Took the photos with Vistura Capture? The tour is already open in the editor with your rooms in it: go to Step 2.
Step 2: Link the photos
A link is what buyers tap to walk from one room to the next.
On a computer:
- Select the photo of the room where the walk starts.
- Drag the next room's photo from the list onto the view, over the door that leads there. A link appears on the door.
On a phone:
- Open the photo of the room where the walk starts, and close its settings with the X.
- Tap Add (the + at the top right), then Point on the photo.
- Tap the photo where the door is. A point appears there.
- Tap the point to open its settings, and keep Another photo chosen under What a tap does.
- Under Leads to, pick the next room's photo.
Then open the next room and link it back, so buyers can walk both ways. Do the same for every room. More detail: Link the rooms so buyers can walk through.
Step 3: Add your card
New tours start with your card, so this step is often ticked already. Check that it shows your details.
- If the card is not there, select Add, then Agent card.
- Select the card, then Use my profile to fill in your name, photo and phone number.
Step 4: Share the tour
- Select Preview at the top and walk through the tour as a buyer.
- Select Share at the top right. On a phone, it is the share icon.
- Under Who can see it, choose Public. New tours start as Private.
- Under Tour link, select Copy, or send the link from Send via.
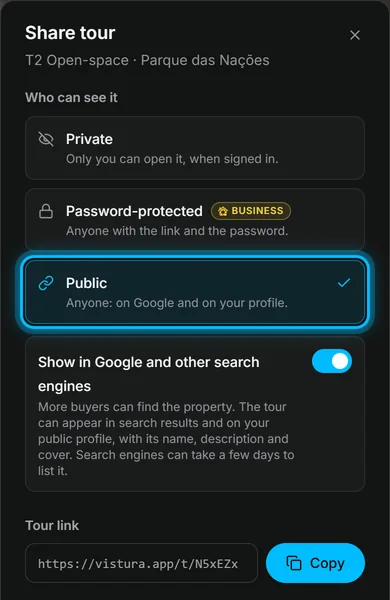
Result the guide shows The tour is ready and closes by itself. Anyone with the link can walk through the home.
Was this helpful?
Thanks for telling us.
Sorry it did not help. Write to us and we will answer: support@vistura.app