Floor plan symbols: what they mean and how to read a plan
Floor plan symbols explained: walls, doors, windows, stairs, fixtures and listing abbreviations, plus how to read a floor plan in six steps.
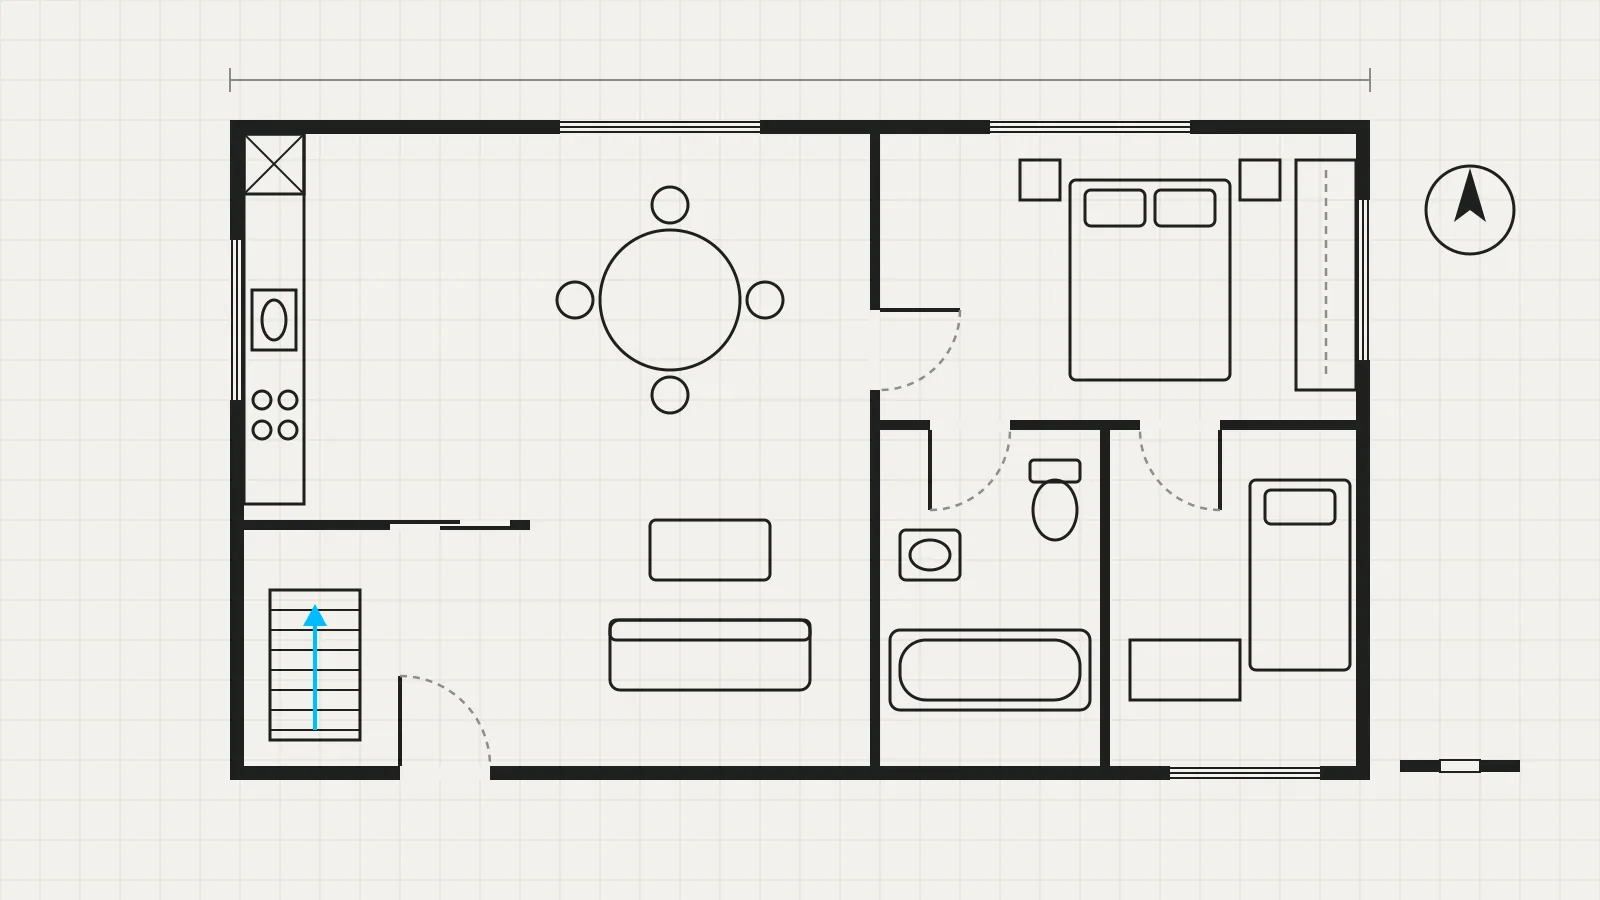
Floor plan symbols are the marks a plan uses for walls, doors, windows, stairs and fixtures, drawn as seen from above. A builder's drawing can use hundreds of them, but a listing plan uses only a dozen or so. This guide shows each one and what it tells you about a home, lists the abbreviations you will see next to them, and then explains how to read a floor plan in six steps, with the questions to ask the agent at the end.
The floor plan symbols you will see on a listing
A floor plan is drawn as if the house were sliced horizontally, usually around a metre (3 to 4 ft) above the floor, with the top lifted off and the rest seen from above. That is why windows show as lines in the wall, worktops and baths show, and ceiling lights do not.
Drawing offices follow standards. In the US, the National CAD Standard brings together CSI's Uniform Drawing System, which has its own modules for symbols and for terms and abbreviations. Internationally, ISO 7519 sets the general principles for building drawings. Listing plans are simplified versions of these drawings, and every office draws a little differently, so when a plan has a legend, the legend wins.
Walls and openings
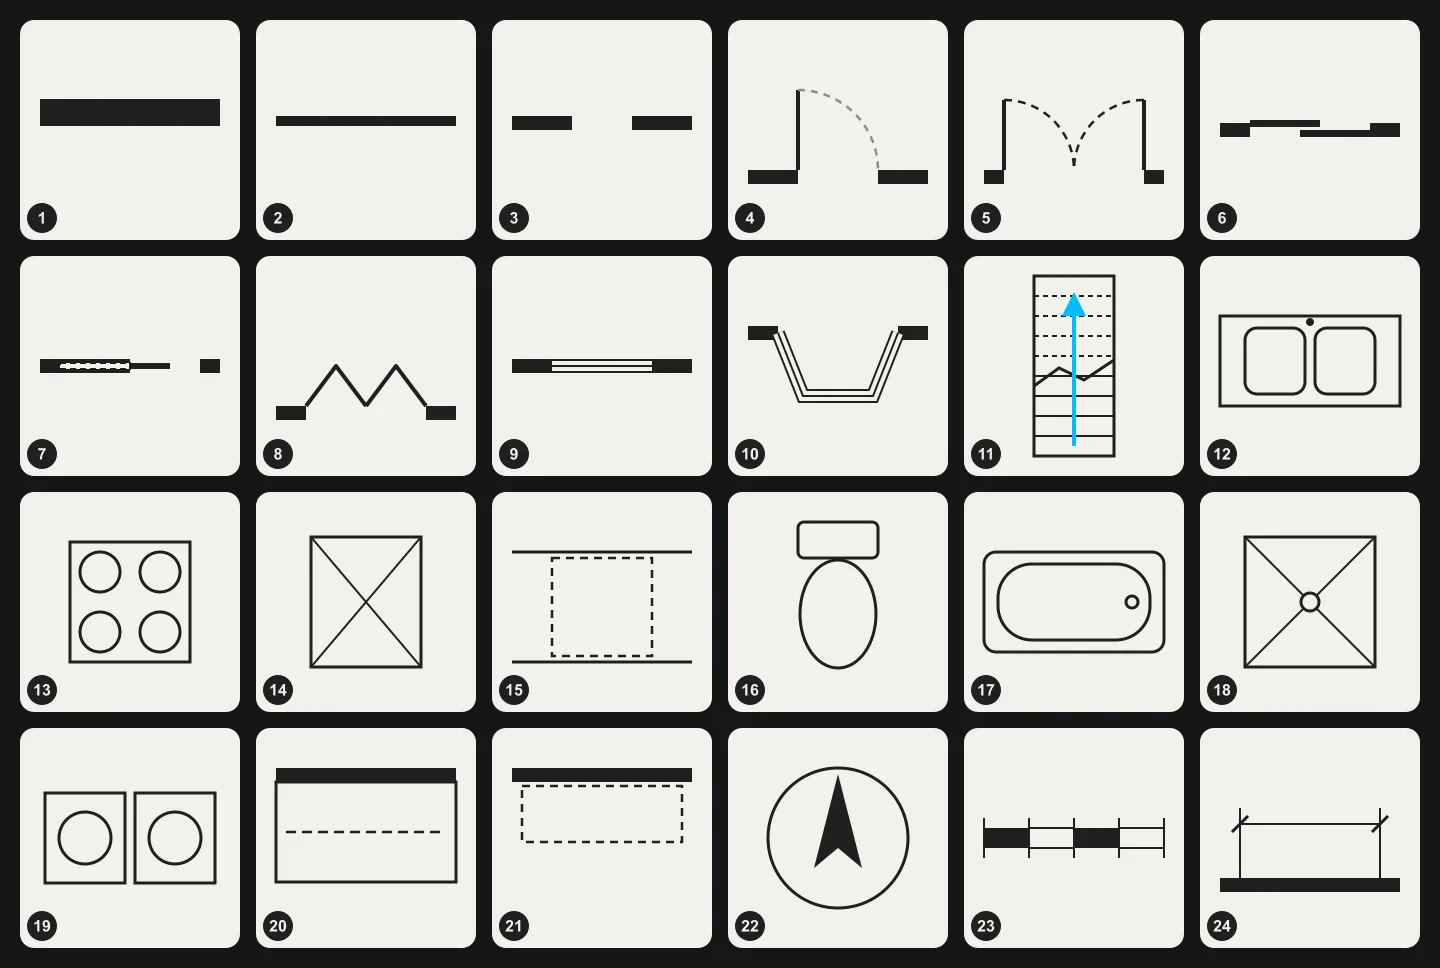
- Exterior walls: thick solid bands, often filled black. Outer walls are usually drawn thicker than inner ones.
- Interior walls: thinner solid bands.
- Opening or archway: a gap in the wall with no arc and no lines. You walk straight through; there is no door to close.
- A thin line across a gap: often a change of floor finish, for example where carpet meets tile.
For a buyer, walls show how open the home is. A kitchen with a wide opening to the living room reads very differently from one behind a door.
Doors
- Swing door: a gap in the wall, a straight line for the door leaf at a right angle to the wall, and a quarter-circle arc from the tip of the leaf to the other side. The arc shows which way the door opens and the floor space it sweeps.
- Double door: two leaves hinged on opposite sides, with two arcs meeting in the middle.
- Sliding door: two thin parallel lines, offset and overlapping inside the gap.
- Pocket door: a leaf drawn sliding into the wall beside the gap, often dashed inside the wall.
- Bifold door: a zigzag or V shape in the gap, common on closets.
- Garage door: often a dashed line or a wide gap across the garage front.
The arc is the one to study. A door that swings into a small bathroom, against a bed or into a hallway takes up space you cannot use for anything else.
Windows
A window is a gap in the wall filled with two or three thin parallel lines (the glass and frame). A bay window shows the same lines on a three-sided bump that sticks out of the outer wall. A sliding patio door looks like a window that reaches the floor; it often carries a label or a door symbol so you can tell the two apart.
Count the windows in each room. It is the quickest way to judge natural light from a plan.
Stairs
Stairs are a rectangle with evenly spaced lines for the treads. A line runs along the middle of the flight and ends in an arrowhead, often with UP or DN beside it. The arrow tells you the direction of travel from the floor you are looking at: UP climbs to the floor above, DN goes down to the floor below.
Partway along the flight you will often see a diagonal or zigzag break line. That is where the plan's horizontal slice cuts the stairs. Drawing software such as Archicad treats this break line as the cutting plane and lets the drafter draw the treads beyond it in a different line type, often dashed. The details are settings, so they vary by office and software.
Kitchen and bathroom fixtures
| Fixture | What it looks like | Common label |
|---|---|---|
| Sink | A rectangle or circle (the bowl) set in the worktop, one or two bowls | |
| Cooktop or range | A square with four circles (the burners) | |
| Refrigerator | A rectangle, sometimes with an X or a line on the door side | REF |
| Dishwasher | A box under the worktop line, often dashed | DW |
| Toilet | A small rectangle (the tank) against the wall with an oval (the bowl) in front | |
| Bathtub | A long rectangle with a rounded shape inside and a small circle for the drain | |
| Shower | A square with an X from corner to corner, or a small circle for the drain | |
| Vanity | A worktop band with a basin in it |
The worktop runs as a band along the walls. Its length tells you how much counter space the kitchen has.
Laundry, closets and storage
- Washer and dryer: two squares side by side, often with a circle in each, or labelled W/D, or W and D.
- Closet: a shelf band along a wall with a dashed line in front of it for the hanging rail.
- Walk-in closet: a small room labelled WIC.
- Linen closet and pantry: small cupboards labelled LIN and PAN.
Storage sells homes and is easy to miss on a plan. Look for these labels before you look at room sizes.
Dashed lines
A dashed line usually means something above the slice or hidden from view: wall cabinets over the worktop, a beam, a change in ceiling height, the edge of a loft or mezzanine. The same dashes also mark pocket doors and closet rails, so read them in context and check the legend.
Electrical and HVAC
Outlets, switches, light fittings and air vents have their own symbols, but they belong on electrical and mechanical drawings. Listing plans rarely show them. If you see a plan full of circles with lines and small triangles, you are probably looking at a builder's drawing rather than a plan made for buyers.
North arrow, scale and NTS
- North arrow: an arrow, often inside a circle, marked N. It tells you which way the rooms face, and so where the sun comes in.
- Scale: written as a ratio such as 1:100 (1 cm on paper is 1 m in the home) or in imperial terms such as 1/4 in = 1 ft. Same idea, different units.
- Scale bar: a bar of alternating black and white blocks. It stays correct even when the plan is printed larger or smaller, which a written ratio does not.
- NTS: not to scale. The drawing shows the layout, and the written sizes are the only measurements to trust.
Dimensions
On US plans, 12'-6" means 12 feet 6 inches. Room sizes are usually written as width by length, for example 12' x 14'. Metric plans use metres (3.80 m) or millimetres (3800). Dimension strings outside the walls, with tick marks or arrowheads at both ends, measure whole walls or the whole house rather than single rooms.
Floor plan abbreviations
Abbreviations are not universal. The same letters can mean two different things on two plans (SD can be a smoke detector on one and a sliding door on another), so read them in context and check the legend. These are common on US plans. CLG, DIM, TYP and AFF come from builders' drawings and turn up when a listing reuses one:
| Abbreviation | Meaning |
|---|---|
| BR or BDRM | Bedroom |
| BA | Bathroom |
| PDR | Powder room (toilet and basin, no bath) |
| MBR | Master bedroom (some newer plans use PRI, primary) |
| WIC | Walk-in closet |
| CL | Closet |
| LIN | Linen closet |
| PAN | Pantry |
| KIT | Kitchen |
| UP / DN | Stairs going up / down |
| W/D | Washer and dryer |
| DW | Dishwasher |
| REF | Refrigerator |
| WH | Water heater |
| FP | Fireplace |
| CLG | Ceiling |
| NTS | Not to scale |
| DIM | Dimension |
| TYP | Typical (the same detail repeats elsewhere) |
| AFF | Above finished floor (a height) |
How to read a floor plan in six steps
These steps work on any listing plan, whether you are buying or checking a plan before you publish it.
1. Find the legend, scale and north arrow
Look for the floor name too (ground floor, first floor, basement). If the plan has no scale and no NTS note, treat every size as approximate until someone confirms how it was drawn.
2. Start at the front door and walk the plan
Put your finger on the entrance and follow the path a visitor takes. What do you see first: the living room, a corridor, the kitchen? Note how many doors you pass to reach the bedrooms.
3. Read each room's size against your furniture
Measure your largest pieces (bed, sofa, dining table, wardrobe) and check them against the room sizes. Remember that the door arcs and windows take wall space too.
4. Follow the doors and their swings
Check where two doors clash, where a door hits a toilet or a bed, and which rooms open straight off the living area. A bedroom door opening onto the kitchen matters to some buyers.
5. Count the windows and read the north arrow for light
Count windows room by room, then use the north arrow to see which rooms get morning or afternoon sun. Our guide to south-facing houses explains what each orientation means for light.
6. Check storage, laundry, stairs and the total
Find the closets, the laundry space and the direction of the stairs. Then compare the total area on the plan with the area in the listing. If they differ, ask how each was measured: how to measure square footage explains why two honest numbers can disagree. To add up room sizes yourself, use the free square footage calculator.
Before a viewing, ask the agent three questions:
- Is the plan to scale, or only indicative?
- When was it drawn, and by whom?
- Does it still match the home, after any renovation or extension?
Mistakes on listing floor plans
If you are an agent, run through this list before the plan goes on the listing. Our guide to real estate floor plans covers what a listing plan should show and how to get one, including the classics: an out-of-date plan, a blurry scan, one plan for several floors. These are the symbol mistakes that slip through:
- No north arrow. Buyers cannot tell which rooms get the sun.
- Sizes in the wrong unit, or rounded inconsistently. One room to the inch, the next to the nearest foot.
- Doors missing or swinging the wrong way. A missing arc hides a clash a buyer will find at the viewing.
- Fixtures in the wrong place. A bath drawn where there is now a walk-in shower.
- A plan from before a renovation. The wall that was knocked through is still on paper.
- A CAD sheet full of electrical symbols. Buyers cannot read it; strip it back to walls, doors, windows and fixtures.
- No "not to scale" note on a sketch. If the plan is indicative, say so.
- Stairs with no direction. Without UP or DN, a buyer cannot tell which floor the flight leads to.
Draw a plan with these symbols
Measure first: our guide to room measurement apps shows how to get each room's size with a phone or a laser measure.
Then draw it in Vistura's free floor plan maker, in the browser with no account. Drag out each room on a snapping grid, or draw any shape corner by corner, and type the sizes in feet and inches or metres. The plan shows the room names, sizes and areas, the outside wall lengths, doors with their swing and windows, with walls 4, 6 or 10 inches thick. The tool works out each room's area and the total floor area. Download a PNG for the listing photos, or a one-page PDF on Letter or A4 printed at a true scale such as 1:100, with the scale printed under the plan. There is no watermark or credit line on the files, and the plan stays in your browser.
Put the plan inside a 360 tour
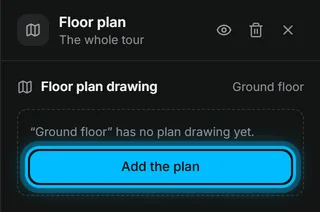
A plan on paper shows the layout. In a Vistura tour on Pro and Business, the plan of each floor sits inside the 360 tour and follows the visit: the visitor's current room is marked, a cone shows which way they are looking, and tapping a room's marker on the plan takes them there. Several floors fit in one tour, and the plan opens larger on screen with zoom. You upload the plan of each floor as a PNG, JPG or SVG (the PNG from the free tool works) or draw it in the editor with "Draw the plan". Every account starts with 14 days of Pro, no card needed; the plans are on the pricing page. For the whole picture, read our guide to virtual tours for real estate.
Conclusion
Read any floor plan in the same order: the legend, the scale and the north arrow first, then walk it from the front door, following the doors, windows and stairs. The symbols are few, and once you know them a plan tells you more about a home than most photos. Draw yours with the free floor plan maker and show it inside a tour.
Frequently asked questions
What does the arrow on stairs mean on a floor plan?
It shows the direction of travel from the floor you are looking at. Most plans add UP or DN next to it, so an arrow marked UP means the flight climbs to the floor above. If there are no letters, check the plan of the other floor.
What does a dashed line mean on a floor plan?
Usually something above the level where the plan is cut, or hidden from view. Wall cabinets, a beam, a change in ceiling height, the edge of a loft and a door that slides into the wall are common examples. The legend says which.
What does W/D mean on a floor plan?
Washer and dryer. It marks the space and connections for laundry machines, sometimes drawn as two boxes marked W and D. It does not always mean the machines are included in the sale, so ask.
Are floor plan symbols the same in every country?
The ideas are shared. Walls, door swings, windows and stair arrows look much the same everywhere. Abbreviations, units and the details change. ISO 7519 sets general principles for building drawings and national standards add their own, so the plan's legend is the guide.